CONSEILS LASER/ILCA : Comment remplacer et installer l'auto-vidage
Que vous installiez un dispositif d'arrêt automatique pour la première fois sur un ancien Laser ou que vous en remplaciez un sur votre ILCA ou Laser, ce guide étape par étape que nous avons créé vous guidera tout au long du processus.
Que fait exactement un auto-sauveteur ?
L'auto-videur est là pour (vous l'avez deviné) évacuer automatiquement l'eau. Les Lasers d'origine avaient simplement un trou à l'arrière du cockpit avec un bouchon en caoutchouc. Pour l'utiliser, vous deviez retirer le bouchon pour évacuer, puis le remettre en place pour empêcher l'eau de rentrer. Super basique, et pas un système génial.
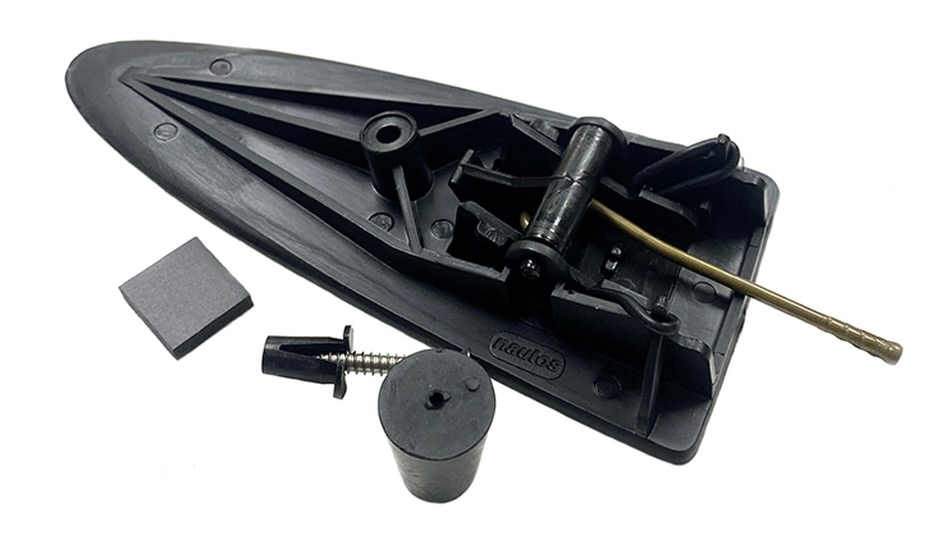
Les Laser / ILCA modernes sont équipés d'un système de vidage automatique en plastique noir intégré à la coque, ce qui constitue une grande amélioration. Il fonctionne grâce à l'effet Venturi qui aspire (ou aspire) l'eau hors du cockpit lorsque le bateau est en mouvement. Il est beaucoup plus facile à utiliser car il est désormais automatisé. Cette mise à niveau est désormais présente sur tous les bateaux modernes.
Si vous souhaitez en savoir plus sur la dynamique des fluides et sur la manière dont l'effet Venturi et le principe de Bernoulli s'appliquent à votre bateau, consultez cet article sur Physics Stack Exchange (cliquez ici) .
Étapes à suivre pour installer un ILCA / Laser Autobailer :
- Retirez l'ancien auto videur : l'auto-videur est fixée à la coque par une seule vis. Lorsque vous la retirez, vous pouvez constater qu'elle est « collée » à la coque - cela se produit lorsque trop de silicone a été utilisé précédemment pour « sceller » l'auto videur à la coque. Ainsi, après avoir retiré la vis, vous devrez peut-être tirer un peu sur l'écope elle-même. N'oubliez pas de retirer également le bouchon de la bonde du cockpit à l'intérieur de votre bateau - faites-le tourner d'un côté à l'autre et tirez.
- Nettoyez la zone : grattez les éventuels restes de silicone sur les bords et dans le trou de vis. Coupez tout silicone ou ruban adhésif collant.
-
Vérifiez l'ajustement : le nouveau vide-ordures doit être plat et bien ajusté. Cela dit, il peut y avoir deux problèmes :
- Parfois, un auto videur peut avoir une légère courbure. Placez-la donc sur la coque et assurez-vous qu'elle est bien alignée. Une légère indentation dans la coque est préférable à une saillie
- Les espaces sur le bord avant ne sont pas idéaux, l'auto videur doit être bien alignée.
- Une seule goutte suffit : mettez une goutte de silicone de la taille d'un « gros pois » sur le trou de la vis avant l'installation. Vous pouvez également tremper la moitié des filetages de la vis dans du silicone. Ne vous laissez pas aller. Il ne s'agit pas d'une question de « plus, c'est mieux ».
- Installation : glissez la barre en laiton dans le trou qui mène au cockpit. Poussez l'auto videur dans la coque et effectuez un dernier contrôle d'ajustement. Serrez ensuite la vis en veillant à ne pas trop serrer. L'écope ne doit pas bouger du tout. Installez le bouchon du cockpit depuis l'intérieur du cockpit. Vous pouvez le faire à nouveau en le tournant fermement.
- Vérifiez le fonctionnement : lorsque le bouchon est enfoncé, la goulotte doit être bien fermée. Lorsque le bouchon est retiré, la goulotte doit être complètement abaissée. Assurez-vous qu'elle fonctionne correctement.
L'histoire de la coque :
La forme de la coque du Laser / ILCA n'a pas changé - y compris l'emplacement de l'auto-videur. Cette indentation dans le fond est la même qu'elle l'a toujours été, ce qui signifie qu'un nouvel auto-videur acheté cette année s'adaptera à un Laser des années 1970.
Si votre bateau est très vieux , vous remarquerez peut-être un petit changement. Il ne s'agit pas de la coque, mais de la bague qui relie la coque au cockpit. Dans les bateaux modernes, il y a un raccord en laiton qui comble cet espace. Dans les bateaux jusqu'au début des années 90, c'était du plastique.
Nous vendons un kit de bagues pour auto-videur, vous en avez besoin si vous ajoutez un auto-videur à un vieux bateau qui a la bague en plastique noir d'origine : Kit de bagues ILCA/Laser
Qu'en est-il de ces ressorts Bailer ?
Pendant des années, il n'y avait que de petits élastiques à l'intérieur de l'auto-videur qui tiraient la goulotte pour la fermer. Il s'agissait simplement de joints toriques , agissant comme des ressorts - et ils s'usaient au bout d'un an environ. Les nouveaux auto-videurs en sont toujours dotés, mais il existe une mise à niveau qui vaut la peine d'être effectuée :
Pour garantir un fonctionnement fiable pendant des années, achetez un ressort de sécurité. Il est en métal, durera éternellement et ne s'usera jamais.
Boutique : Ressorts d'envol C-Vane (cliquez ici) , Joints, Kit de réparation Auto Videur Laser ILCA, Bouchon de Cockpit Laser ILCA
Dernier mot:
Un cockpit rempli d'eau n'est pas une partie de plaisir. Une méthode simple pour résoudre ce problème est l'auto videur originale : votre pied. Tournez l'intérieur de votre pied à plat le long du fond du cockpit et donnez un coup de pied vers l'arrière. Vous pouvez ainsi évacuer 70 % de l'eau. C'est ennuyeux et distrayant, mais si vous chavirez ou traversez une grosse vague et que le cockpit est plein, donnez un coup de pied !
Pour tout le reste, un auto-videur en bon état de fonctionnement sera un bon compagnon pour garder le cockpit au sec sans distraction afin que vous puissiez vous concentrer sur la navigation.


